

 We did it! We finished one of the gazillion projects on our hands right now and I am so happy to share our finished built-ins. We started the project a couple weeks back and just put on the final coat of paint this weekend.


 The paint was hardly dry before I dove into the garage and started digging out some of our favorite tchotchkes and books that I haven’t seen in ages (8 months of living through renovations and we are finally starting to un-pack some boxes and settle in). It took us (my dad, Rupe, and I) two LONG full days to build 98% of it, and then another day to finish trimming out the front of each shelf and to paint.
This project isn’t the easiest of DIY’s but if you know your way around a miter saw and a router it isn’t as intimidating as it sounds (just takes a lot of elbow grease). We also utilized Ikea kitchen cabinets for the base of our built-ins which made it a heck of a lot easier. The thing about built-ins are that of course they are unique to each room so I will outline the steps we took and hope you guys can take something away from it.
All the details and product sources for as much as I can remember after the jump!
 First we made a base with 2x4s and screwed it right into the wood flooring. I wanted to elevate the cabinets just 1.75″ so that the 1×2 trim I used for the shelves and spacers would be the same width as the trim on the bottom, so I laid the 2x4s on its side making the base exactly 1.75″.
We used 6 Ikea cabinets, three 30″ and three 15″, to create nine equally sized 15″ doors. I only wanted 12″ deep cabinets since our space is on the smaller size so I chose the boxes that are usually used as upper cabinets. Being uppers, they had an extra lip in the back to account for the hanging mechanism which we didn’t need to use so we nipped off the excess with a router.
 After assembling all the ikea cabinets we secured them to the base, to the wall, and to each other with wood screws. We used 1×2’s as spacers for the time being, to make sure we secured them in the right place.
 Much like we had to build up the base, we also had to build up the first shelf to equal the 1.75″ so we used 1x12s as the shelf and also cut up some small pieces of 1×12’s to elevate it to our desired 1.75″ (as shown above right) which we then trimmed out with a 1×2. (I am getting more confused writing this out then when I actually did it! Hopefully you are making some sense of this). Above right Rupe is measuring out and marking where the shelves will go along the vertical supports.
 We used screws for all the structural connections but I got to bust out the nail gun for all of the trim. Above right, my dad and rupe (who should have definitely been wearing a mask (and shoes for that matter)) are getting sprayed to bits with saw dust while using the router to make 3/4″ dados to hold the 3/4″ wood shelves in place.
 With a bit of glue on each end of the wood shelves (which are 1×12’s cut down to size) they slide into the dados and then more fun with the nail gun to secure them, and the whole thing starts to take shape.
 Lastly, we trimmed out each shelf with 1x2s to match the 1×2 trim around the base (previously upper) cabinets…
 and then primed and painted! Which somehow always takes twice as long as anticipated, but that is it, done and DONE!
We are thrilled with how they turned out, now just to get the rest of the house to match. 🙂 Remember the before?
and then primed and painted! Which somehow always takes twice as long as anticipated, but that is it, done and DONE!
We are thrilled with how they turned out, now just to get the rest of the house to match. 🙂 Remember the before?
Tools used: Miter Saw, Router & 3/4″ bit, Level, Power Drill, Nail Gun, Air Compressor, T Square
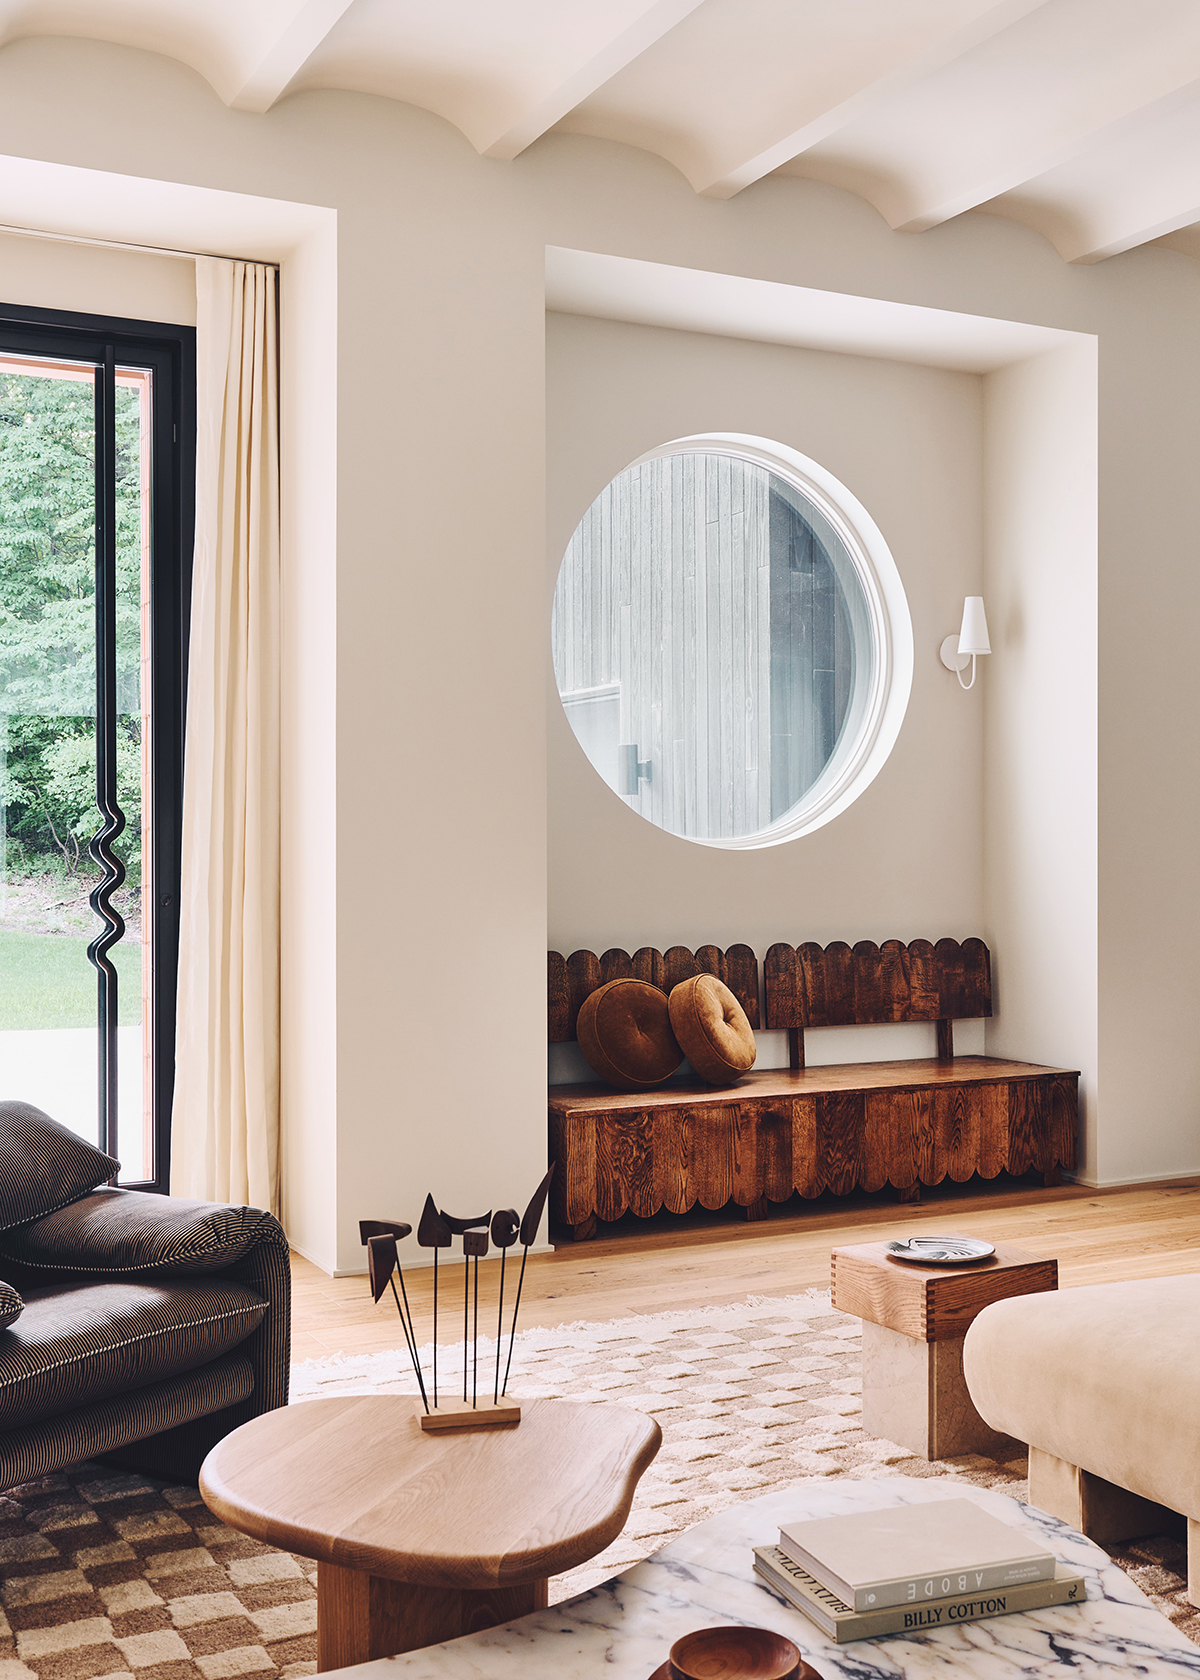
Product Sources: Coffee table (vintage) from Surfing Cowboys // Rug from RugsUSA.com // Chairs (vintage found at Long Beach Flea) // White Vases, Squirrel, Dog Bookends and Whale Pitcher from Jonathan Adler // Gold Starbursts from Waiting on Martha // Gold Bowls and Cube Wire Sculptures from CB2 // Bronze Cats (vintage from Rosebowl Flea) // Framed Photo by Max Wanger // Peony Painting by Pratt Creek Art // Art Deco Clock (vintage) // Ceramic Hand // Starburst Mirror from Target (old) find similar here or here // Brass Hexagon Planter by Ferm Living // Candlesticks from West Elm // Paint Color: Wimborne White by Farrow & Ball
Images by Sarah Sherman Samuel

Branding and Initial Web Design
Nature
Web Design Production
Jane Reaction
Site Development
Alchemy + Aim
oh i love it all- the styling and those chairs and the table…. all of it! swoon!
Can you post the exact before and afters, from the same angle as the befores? The contrast is kind of nuts and amazing from what I can tell, but I want to make sure I am looking at the right picture. The house is so beautiful!
Hi Ayelet, Oh yes! I’ll make sure to post the side by side’s next time. The wall that the shelves are on no is the wall in the third photo on this post. I’ll try and dig up some more before photos so you can see it in context better. (it is also the wall to left in the very last photo. The one with Elmo on it. 😉
Wow! It’s a completely different room! I love how you styled the shelves, Sarah. Awesome DIY!
Can you name the brand of nail gun you used? I’m desperately trying to convince my husband that we could benefit from one but he’s so old-fashioned (aka CHEAP and STUBBORN).
We are in the midst of slowly updating our entire 1948 Cape Cod house and we must’ve spent 1000’s of hours already nailing in SO. MANY. NAILS!
HAHA! @Jaclyn. Your comment just totally made my day. Hilarious! OK we used this one, http://www.homedepot.com/p/Bostitch-18-Gauge-x-5-8-2-1-8-in-Brad-Nailer-BT1855K/100666146 but it is just for small projects like trim and things. Also, it jams up quite a bit and we had to take the whole top apart to get the jammed nail out, so I wouldn’t recommend it. It was cheap and good for small jobs but if you are looking for bigger projects, I’d invest in a better quality one.
Wow! This room is just so great. I like your idea to use Ikea uppers for your base cabinets. Can you tell me what color paint you used?
Well, all that hard work certainly paid off because the shelves look BEYOND GORGEOUS. Love, love, love!
Wow! What a GORGEOUS space. I love the styling of the shelves and those vintage bronze cats are to die for 🙂
Oh yes! Thanks Sarah, I always forget the paint color. It is Wimborne white by Farrow and Ball. Added it up top as well.
Hi! Killer built-in! So the Farrow and Ball paint perfectly matched the Ikea cabinets? And which cabinets are these please? Thanks!
This is such a beautiful built-in. I love that you made the doors recessed into the frames.
Fabulous styling too.
I have a little chair envy there. I have got to get myself up to Long Beach next time. I am trying to manifest some dining chairs!
Amazing! And especially looking at the before, I can’t believe it’s the same place. you got skills girl, skills.
Absolutely gorgeous! Now all I need to do is convince my hubby to build these for me 🙂 Could you tell me where you purchased your ceiling fan from?
Hi Whitney, Thank you! The ceiling fan was here when we bought the house but it is by Hampton Bay.
Love the shelves – pretty storage is essential in every home!
Love it all! Thank you for the instructions. I have been planning out something for around our fireplace. I am also planning to use ikea cabinets at the bottom. Question… What did you use for the vertical supports (the pieces getting the 3/4″ dado cuts in bare feet 🙂 tee hee)… Are they from ikea?
Hi Cindy, thank you! those are primed 1×12’s from Home Depot. That is where we got all the trim and the wood for the shelves as well. Good luck with your project!
This is an important point. The vertical 1×12 boards or what are called primed pine. The shelving units do not appear to be primed. Using primed pine will save you quite a bit of time and you will use less paint. Primed pine needs very little if sanding.you pay more but you save in elbow grease at the end. I would have used primed pine for the shelves as well.
How did you secure the vertical 1×12’s to the wall?
Amazing job! It looks fantastic.. you’ve got me all inspired now.
Obsessedddd homegirl outdid herself!
Hi Sarah, love the white chairs. Where did you purchase those from? Thanks!
My gah these are just gorgeous. Seriously every design decision you guys make with this house is perfection. Love it so so much. Ive been looking into ways to build built ins and this is definitely a great guide.
Absolutely wonderful, Sarah! You guys did a great job.
[…] over Smitten Studio’s home update + spied a few WOM goodies (the […]
Hi Sarah, thank you so much for this great tutorial! I was wondering if you used the Applad doors and then matched it with Farrow and Ball Wimborne White (for the shelves)?
Hey Andree-Anne, yes! We used the applad doors. The Wimborne doesn’t match it perfectly but that is what we had at the house so we used it. (I’m an impatient DIYer and like to use what is at arms length, ha) I plan to finish the doors off with the paint sprayer so that they match (and the finish matches too).
This is INCREDIBLE! What a job, omg, you guys are amazing. This looks so awesome and it’s hard to believe it’s the same house. It’s coming together and I love that you shared these updates. The pictures after the jump were almost shocking at how much work went into this–bravo, seriously a job well done!!
Amazing job – and even more so given that you did it yourself. Seriously awestruck at your DIY abilities 😉
Must be so nice for you guys to finally get a chance to enjoy it all!
Just wondering if you painted the doors also or whether you found a paint for the trim/ shelves to match. Also, did you paint it by hand or use your trusty new spray gun? I’m so going to see if I can figure out how to copy this idea!!
Which IKEA cabinets did you use?
[…] *Living room built-ins that incorporate Ikea cabinets. […]
I just died! Everything is absolutely stunning, I love everything about this space!!
xxx
Monika
I love how you decorated the shelves! I always struggle arranging the stuff on my shelves in a way that’s pretty, so this was definitely some much needed inspiration 🙂 xx
[…] Smitten Studio, creative director and designer Sarah Sherman Samuel provides detailed […]
[…] DIY built-in shelves are […]
Loves amazing! Love the crisp white and all of the personal trinkets! It’s so fun to see how far you guys have come with the place!
xo
Christa
http://www.gardeniasandmint.wordpress.com
[…] Smitten Studio shared this DIY built-in shelving, but lets spend a moment here to take it all in… isn’t Sarah’s style amazing?? I absolutely love everything she does. […]
I love how you placed your books with the spines facing in. I have a bookshelf that I’m currently trying to organize and put together and I may just have to steal that idea!
I just bought a similar white and grey diamond shag rug and it’s already filthy in the areas where people have walked on it! I’m been searching the internet high and low for cleaning tips, and can’t seem to find anything that helpful. How do you keep it so clean?! Please help! 🙂
P.S. Your house is gorgeous!
Hi Lily,
We don’t do anything special with ours, just vacuum it pretty frequently and spot clean if there is a spill (or a dog piddle which happened once. ha).
[…] 1. Trevor Tondro (photographer and source), 2. and 3. Smitten Studio (source), 4. Douglas Friedman for The Hollywood Reporter, 5. Amanda Nisbet (designer and source), […]
[…] This Ikea shelving unit totally blows my mind. From installation to styling to how it integrates into the full room… […]
[…] obsessing over Sarah Sherman Samuel’s, of Smitten Studio, DIY built-in shelves and amazing styling skills. I love all the brass and the books turned the […]
These are stunning. Would you mind sharing the name of the IKEA cabinets you used? I am thinking of building something similar and would need narrow cabinets like these.
Could you do a video of the house? 🙂
Could you do a video of the house?
Hi Sarah!
Could you please tell me what your wall color is? I see the shelf color, but wanted to know what wall color you used throughout your home?
Thanks!
[…] 1 | 2 | 3 | 4 […]
[…] Sarah’s amazing DIY built-ins – Actually, her entire living room is […]
Hey Sarah! We are looking into getting a Moroccan rug and I love the one in your photo and you can beat the price. Does yours shed a lot? How is the quality? Thanks again:)
Sarah
Thank you so much for this wonderful post I have read it in detail and I think we will be doing the same for a built in project were starting soon
Can you clarify what you used for the vertical supports and we’re they trimmed out and if so with what size trim?
Thank you so much
Hi Rebecca. The vertical supports are 1x12s and they are trimmed out at the front with 1x2s.
[…] sources: photo one by Smitten Studio // photo two by A House In The Hills // photo three by Smitten Studio // photo four by A House In The Hills // photo five by Jason Grant via SF Girl By Bay // photo […]
amazing, amazing, amazing! cannot believe this is a DIY, its very inspiring.
did you simply nail the trim and then paint over the nail heads?
bravo!
Hi Claire, thank you! Yes I nailed the trim and then filled the tiny holes with a wood filler and then painted over it.
About that coffee/accent table that you see around the patio and here in the living room. Is it petrified wood ? & where did you purchase this if you did. Amazing work Btw!
[…] || striped skirt & wedges || black door with ivy || girl with floppy hat || Mark Nepo quote || sunburst living room || black […]
[…] via […]
Simply beautiful! Love that you did the shelves yourself!
[…] här fina manikyren, plus att jag behöver streetstyletjejens outfit fast i form av klänning då. Läs dessutom gärna det här blogginlägget om de inbyggda hyllorna! Megainspirerande, speciellt om man bor litet eller har en lokal. Kan vi […]
[…] | 2 | 3 | 4 | 5 | 6 | 7 | 8 | […]
[…] Image via Sarah Sherman Samuel […]
[…] Feature Photo via […]
Hi!
Can you please tell me the name of the cabinets that you used for this DIY?
Hi Sarah! I am absolutely loving everything about this! I just recently bought a home with empty space on either side of a fireplace that is just dying for built-ins, and I am planning on doing something similar to this. (imagine my joy stumbling across this post in the midst of my own planning!!)
I was just curious of the vertical space between your shelves? Thanks! 🙂
I am looking at IKEA and don’t see the cabinet doors you used, but can you pretty please provide the link to the base cabinets? It is easy to get lost in the maze of the IKEA website and zillions of product lines.
RCG
Hi, ikea discontinued their entire line of kitchen cabinets and switched to a brand new system so my exact ones are no longer available. However I can say they are originally wall hanging cabinets. The ones that go above the counter, attached to a wall in the kitchen.
hi there,
can you tell me what you topped the cabinets with (specifically under your tv)? is this the ikea countertop? we are currently putting ikea base cabinets together in our basement for a built in look and our countertops are 138″ long. we’d like to do a quartz surface but it’s so expensive. i’m worried joining an ikea countertop (white) would look cheap and wear quickly over time. thoughts?
[…] sources 1, 2, 3, 4, 5, 6, […]
[…] via Storiesimage via Young House Loveimage via Style Me […]
[…] Image Source […]
[…] When most think about built-in shelves and wall units, they think about large and lengthy designs. But that’s not always the case. In fact, you can create smaller designs that fit your needs and spaces.{found on sarahshermansamuel}. […]
[…] 1 | 2 | 3 | 4 | 5 […]
[…] Featured Image via Sarah Sherman Samuel […]
hi, love this! in another photo i saw cabinet knobs or pulls, are they leather? where are they from?, love them in this room.
what’s the source of the reddish rug you can see in one of the pics? I love it!
[…] source, nella seconda immagine lo schema è realizzato da me […]
Hi!
Love what you did here and we’re interested in attempting something similar but we’re a bit confused as to how the shelves are supported. Just sliding them into those grooves doesn’t seem like it would provide much support in the center.
[…] image via sarah sherman samuel […]
[…] house update: DIY built-in shelving […]
[…] house update: DIY built-in shelving […]
I cannot get over how awesome this project turned out! It seems so daunting! But, we’re thinking about tackling it. ? How’d you paint? Roller or spray? You’re seriously a DIY queen!
We used a roller and brush but SO wishing we had sprayed! Would have been so much easier
Hi, I was wondering if you put 1×2 trim on the far right and far left of the built ins? (The part that touches the wall?
Super excited about this! Best DIY built ins on Pinterest! Thanks!
Also how did you secure the vertical 1×12 (the sides of the bookshelfs to the wall?
[…] main projects of gutting the kitchen, adding on a bedroom, bathroom and laundry room, we also made these built-in shelves and finished the entryway, and in the process I cleaned out this living room corner of everything, […]
[…] Image Source […]
Pretty section of content. I just stumbled upon your weblog
and in accession capital to assert that I acquire actually enjoyed account
your blog posts. Anyway I’ll be subscribing to your augment and even I achievement you
access consistently fast.
[…] Image via Sarah Sherman Samuel […]
[…] A medallion above the television helps balance everything and distracts your eye from the black box. Source: Sarah Sherman Samuel […]
[…] Sarah Sherman Samuelvia Southern Hospitalityvia Our […]
[…] Sarah Sherman Samuelvia Southern Hospitalityvia Our […]
[…] room: Built-in Shelves are DIY (see here) // Rug from Esalerugs // Chairs are vintage // Stool from Lulu & […]
[…] room. We also switched the windows out for french doors which brings in so much more light, painted, installed the built-in shelving, ripped out the carpet and installed hardwoods to match the rest of the […]
How did you attach the verticals to the wall?
[…] source – Sarah Sherman Samuelhouse Update Diy Built In Shelving Sarah Interesting Built In Shelves […]
May I ask the total cost of this project?
[…] house update: DIY built-in shelving […]
[…] While we might envy those who own a home with high ceilings, it can be hard to style all that space well. Adding your own built in shelves can give you decorating access to all that extra head space in a snap. […]
[…] spot in the house, repurposed the bar in the spare bedroom, and the gave the rug a new home in the den. So basically, we are starting again from scratch. Below is a peek at how it is coming along and […]
How deep into the 3/4″ material did you go with the router for the shelves to slide into?
[…] via Sarah Sherman Samuel […]
Just going through the archives and discovered you all are ‘the barefoot DIYers”! Ha Ha
[…] Sarah Sherman Samuel […]
[…] Built-in shelves are the essence of any living room! They make an ideal decor piece. If you happen to know your way around using a miter saw, then you can easily craft this DIY bookcase from scratch. A little bit of cutting, lots of paint, and combining them together into one piece. sarahshermans […]
Hi! What color paint did you use to match the wood to the ikea products?
[…] While we might envy those who own a home with high ceilings, it can be hard to style all that space well. Adding you’re own built-in shelves can give you decorating access to all that extra head space in a snap. […]